Showing posts with label Closet. Show all posts

Tuesday, January 17, 2012

Art Closet Reveal! Before and After....

The inspiration for organizing my art closet was from the blog Pink Suede Shoe (love love love that blog!).  Here's is the picture that started it all:


Here is my "BEFORE" (some of you may need to look away as this may cause anxiety).

Wow...that's embarrassing!
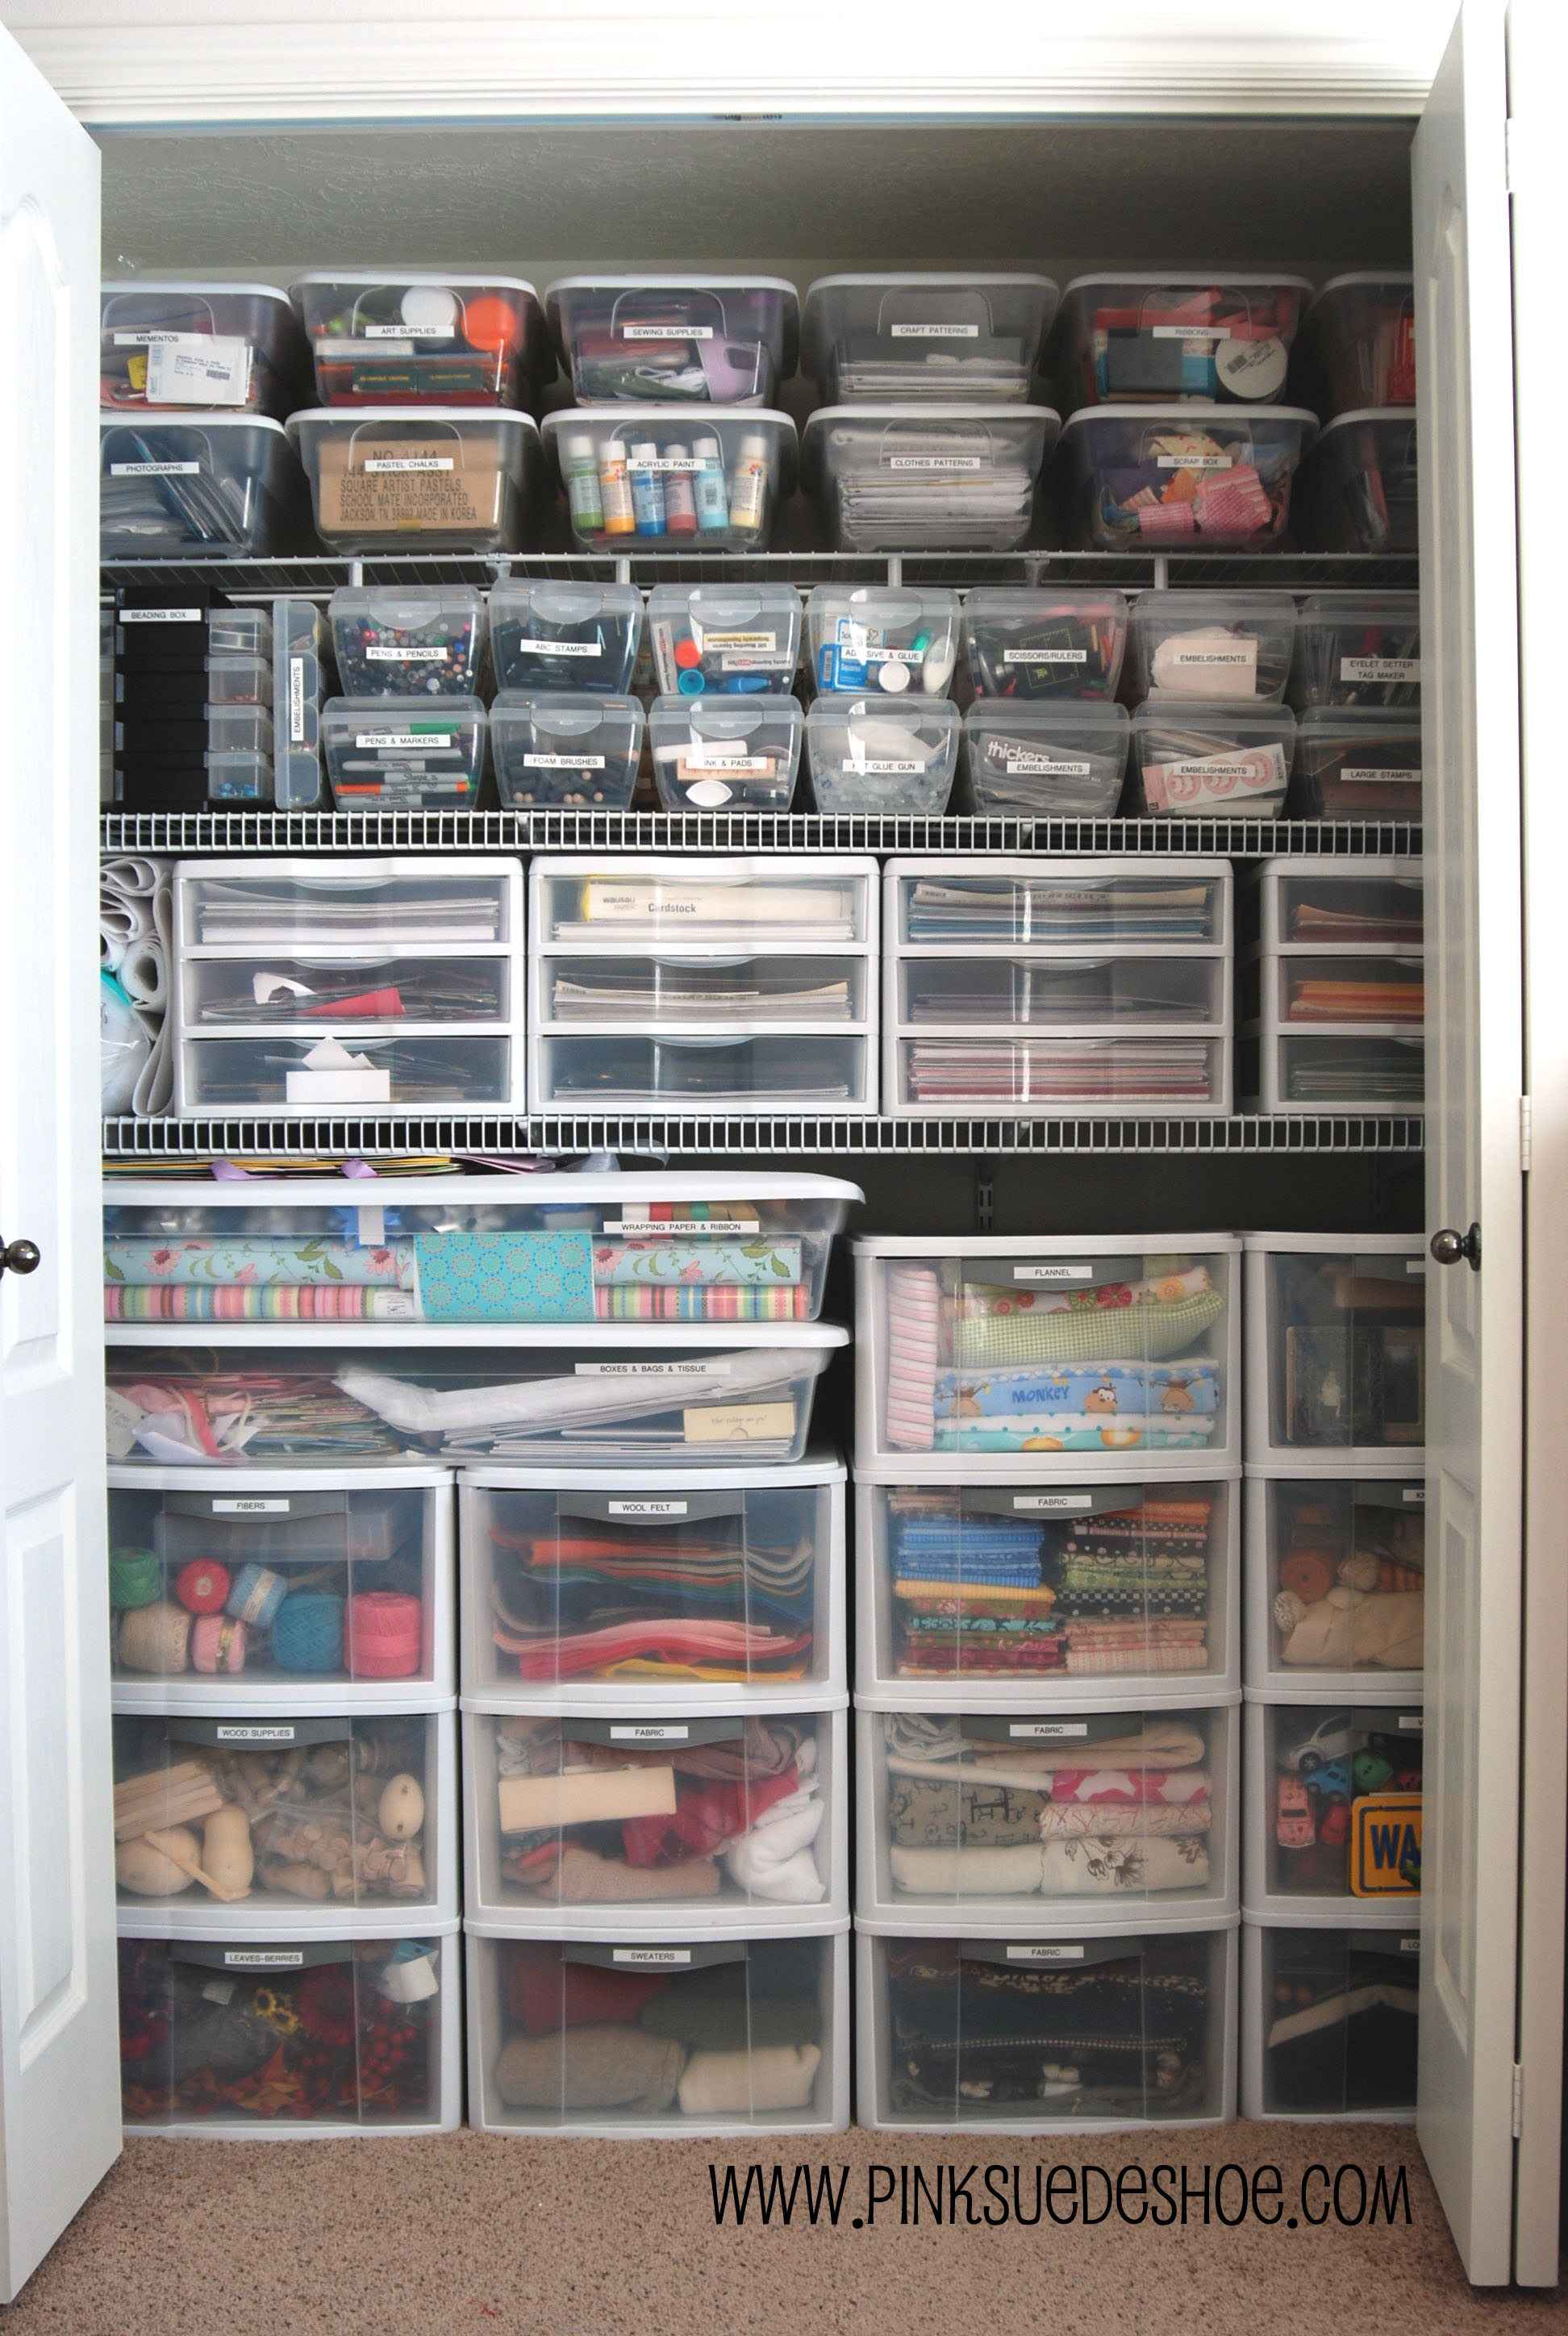
And my "AFTER"!!!!!

I am SO happy with the final result!  

For my birthday, I asked my husband for the money to make an organized art closet...he was more than happy to (and I think a little relieved that he didn't need to shop for a present!:), plus the handyman that he is, he even shopped, measured and installed the 2 new mdf board shelves.  He's such a good man! 

Here's a project breakdown:
  • Purchased 2 MDF boards from Home Depot - $9.99 each.
  • Took down the rod and replaced it with one of the boards.  It is the perfect fit for my beading boxes and my table easel for painting as you can see in the photo below.


  • Purchased 16 clear shoe box containers from Home Depot - (sale!) $0.99 each.
  • Labelled each box and filled it with supplies, they fit perfectly 2 x 2 above my newly added shelf! 
At the very top of the closet is a very tall space, so any of the Christmas decorations that didn't fit into my rubbermaid containers were placed up there...as well as some Christmas craft items from boxing day!


  • Purchased 2 tall sets of plastic drawers at Canadian Tire - (sale!) $19.99 each
  • Filled them with art supplies for the kids to use. 
  • Above the plastic drawers went the second mdf board...makes a lovely set up.
The drawers are so handy as they are on wheels so the kids can roll them into any room to do their arts and crafts.  They also love that everything is labelled.  Things are so easy to find now!  


In the right corner in the photo below, you will also see 4 white boxes.  Those are photo boxes from the craft store, Michael's, which I purchased on sale for only $2.50 each...(one of my future BIG projects!).


I saw this next idea on Pinterest (see photo below).  On the right had side of the closet, attached to my wall, I have one of the plastic bag holders from Ikea.  I am using this for my rolls of wrapping paper as well as my shelving paper.  It's so awesome to have it neatly tucked away and it is such an easy idea!!


I just want to give a special mention to the sewing machine you see in my art closet.  My mom passed away in March and one of the things I "inherited" was her lovely sewing machine.  This is probably a good time to mention that "I do not know how to sew".  BUT!...I am determined to learn!  I'll start with something easy...like this pillow tutorial or this cool fancy tea towel tutorial over at one of my favourite blogs...Mini Manor.  If you love design and organizing, you'll love this blog too!  Say hi to Ashli for me!


And that, Ladies and Gentlemen, is my Art closet!


"oooooooh.....ahhhhhhhhhh"


You can also find me at these great linky parties!!

Tuesday, January 03, 2012

25 clever ideas to make life easier

I am now on PINTEREST!  You can check it out here!

via: marthastewart.com

While searching Pinterest I found this posting on the blog The Daily Buzz.  Let me tell you, I have NEVER been able to fold a fitted sheet (now I can!) and the aloe in the freezer?  Genius!!  Actually all the ideas are genius and all are practical ways to make life easier.  Go check it out!

Here's the link: 25 clever ideas to make life easier

Friday, December 30, 2011

My Art Closet - Before!

We have a closet by the front door of our house and since we always use our back door through our mud room, I decided to make it into an art closet.  My intentions were so good...I swear!  The kids and myself all love doing arts and crafts, so I thought this was a perfect idea!  It started out lovely and organized and slowly became a huge messy closet that all I wanted to do was keep closed so that I wouldn't have to stare at it!  THEN....I saw a photo over at the blog pink suede shoe which inspired me to properly organize my art closet.  It's not nearly as amazing as this...yet, but it's on it's way.  What would we do without other bloggers to inspire us?!  You have to check out her blog, here, it is one of my favourites to read.  Here's the photo that inspired, isn't it pretty!:


And now onto the not so inspiring mess of my art closet before:

First a photo of the door closed....isn't it nice? ha!


And now the door opened...deep gasp...I know!  Such a lot of wasted space.


Oh THAT's where my 5lb dumbells went!  Huh...who knew?!


The upper part of the closet is strictly my stuff, it's not as bad but I know it can be better!


Okay..phew...now we're onto the organizing.  I bought 2 of these storage containers on sale for $19.99 at Canadian Tire.  Then I used my handy dandy label maker and labeled each drawer so that the kids (and myself) can easily find things and easily put things away in their proper places.


Here's a closeup of one of the drawer labels.  Did I really need to add this photo to 
make my point?  Probably not but I just love my label maker so if you could just 
"ooooh" and "ahhhh" over my label for a minute I would greatly appreciate it!


So this is where I'm at so far.  I haven't put the containers into the closet yet as I want to completely empty it and put in shelves.  Currently there is so much wasted space on the sides as I just had a small bookcase in the middle.  I will post more when the closet is complete.  It feels so good to get this started!
What do your art closets look like?
Related Posts Plugin for WordPress, Blogger...